In this post I will detail how to customize the default screens (sleep, power off, etc.) on your reMarkable tablet. To do this you will need to connect into your reMarkable tablet using the root (admin) account. To learn how to do this from a Windows PC please see my guide here: https://www.remarkabletabletuser.com/post/2018/01/02/connect-to-your-remarkable-from-a-windows-pc
The Basics
The default screens you see when powering on your reMarkable, putting it to sleep, etc. are simply image files stored on your reMarkable tablet. In order to customize your reMarkable we are just going to replace these images with our preferred image. The image format used is technically called a “Portable Network Graphics” file. But more commonly it is known as a PNG. You can recognize it from the “.png” file extension (ie. myimage.png).
Creating a Custom Image
In order to get the best result for our customized image we’re going to need to know a little about the medium on which it will be viewed (ie. the reMarkable screen). The official reMarkable documentation lists the screen specs as:
1872 x 1404 resolution (226 DPI)
What does this mean?
1872 x 1404 refers to how many pixels your reMarkable displays – 1872 pixels tall by 1404 pixels wide. “Pixels” being the tiny little squares that form all images you see on digital screens be it your laptop, your cell phone, or your reMarkable. You’re probably familiar with seeing low quality images and how they appear “blocky.” Those images have fewer pixels, whereas devices with a high number of pixels; you can barely see the squares at all. Edges look smooth and crisp. An old school standard definition TV has fewer pixels than a 4K TV.
226 DPI means 226 dots per inch. This is another measurement of image quality. This measurement being rolled over from the days of printing. This is not strictly relevant to digital images. Pixels per inch is the digital equivalent. Essentially we’re measuring the same thing here. 1872 x 1404 on the reMarkable’s 10.4 inch display, gives you a pixel density of 226 DPI/PPI.
When creating our replacement image we’re going to want to keep this in mind.
Image Editors
To create our replacement image we’re going to need an image editor. It doesn’t matter which you choose, go with whatever you’re comfortable with. Popular options might be: Photoshop (requires a subscription), Paint (on Windows), GIMP (free, open source, Photoshop competitor), or even an online editor like www.Pixlr.com
I will give examples using Pixlr, Paint, and GIMP below but will not turn this into an article on how to use each. For further details you’ll need to hit up Google.
Create Your Replacement Image
Now we have the necessary information we’re going to create a new image. Open your chosen image editor.
Pixlr.com
– Navigate to pixlr.com
– Click on “Web Apps”
– Scroll to “Pixlr Editor” and click on “Launch Web App.”

– If prompted to enable Flash, follow the instructions on screen.
– Click on “Create New Image.

– In the New Image dialogue, set the width to 1404 and height to 1872. Click OK.

Paint
– On Windows 10, launch Paint 3D.
– Click on “New+”
– In the top menu click on “Canvas.”
– In the right-hand pane set width to 1404 and height to 1872.
– Use the “+” and “-” icons to zoom in and out.

GIMP
GIMP can be downloaded and installed from: https://www.gimp.org/downloads/
Once installed launch GIMP.
– In the main/central window click on “File” then “New.”
– In the new file window set height to 1872 and width to 1404.
– Click on “Advanced Options” and set the X and Y resolution to “226” pixels per inch.

Edit and Save Your Image
Whichever editor you’ve chosen, continue to edit your image and when complete save is as a PNG.
Pixlr.com
– In the top left corner, click on “File” and “Save.”
– In the Save Image window give your image a name.
– Select “PNG (transparent, full quality)” in the “Format” drop down. Click OK.

Paint
– In the top-left corner click on “Menu.”
– Select “Save As.”
– Select “2D PNG.”

GIMP
– Select “File” then “Export.”
– In the Export window select “PNG image (*.png)” in the drop down.
– Give your image a name and hit “Export.”

Get Your New Image onto Your reMarkable
I’m now assuming that you have a new file you wish to use on your reMarkable Tablet. If you don’t, but would like a sample file to test the concept, then right-click and save the following image:

Next you’re going to want to connect to your reMarkable using WinSCP. If you’re unsure how to do this, please follow this guide:
http://www.remarkabletabletuser.com/post/2018/01/02/connect-to-your-remarkable-from-a-windows-pc
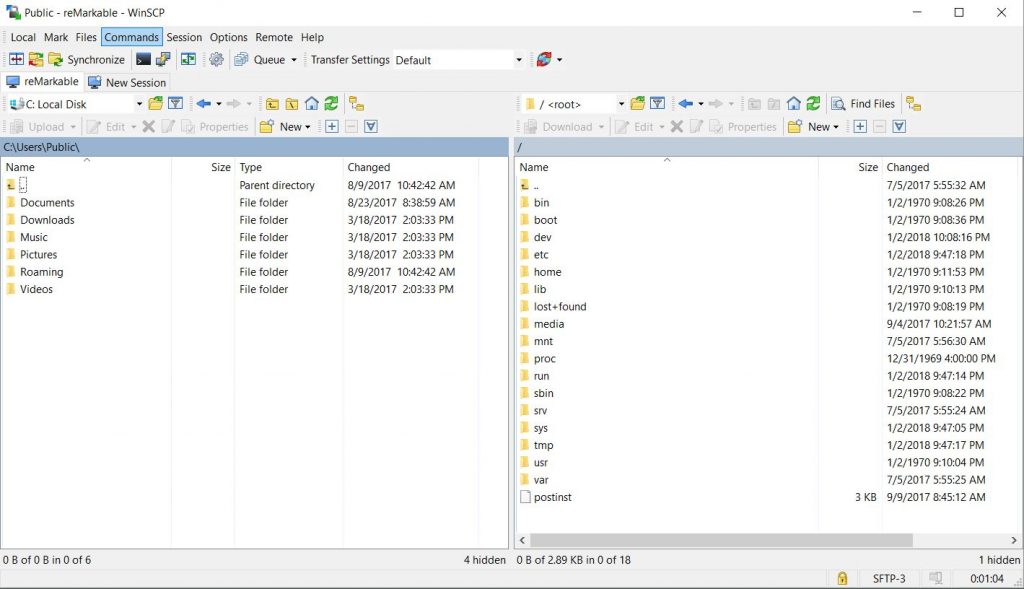
Step 1: Launch WinSCP
Launch the WinSCP application and connect to your reMarkable. The left-hand pane shows files on your Windows PC and the right-hand pane shows the file system on your reMarkable.
Step 2: Show Hidden Files
On the WinSCP menu at the very top click on “Options” then “Preferences.” In the Preferences window click on “Panels” then ensure that “Show hidden files” is checked. Press OK.

Step 3: Navigate to your new file.
In the left-hand pane in WinSCP navigate to the location on PC where your new image file is saved.
Step 4: Navigate to reMarkable screens location.
In the right-hand pane navigate to: /usr/share/remarkable/. This is the location of the reMarkable image files for the various screens. You should see several PNG files in this directory.
They map as follows:

Step 5: Rename the file you want to replace.
Identify which image you want to replace with your custom image file. If you’re using the sample provided above then we’re going to want to replace the sleeping screen, which as we can see here is named “suspended.png.” Right-click the file and “Rename.” Rename the file to something identifiable like “suspended_rmversion.png.”

Step 6: Upload your customized image.
In the left-hand pane select your custom image and in the above menu press “Upload.” This will transfer the image to the current folder on your reMarkable. Once transferred rename the file to have the name of the original file you’re replacing. So in the example of our “sleeping” screen we will want to make sure our new image is named “suspended.png” once uploaded.

Step 7: Test.
That’s pretty much it. To make sure you got it right, disconnect your reMarkable and go to the customized screen to see if the change took effect. If you wish to restore the original screen later, simply connect to your reMarkable again, delete your customized image from the device, and rename the original image back to the correct file name.

One Reply to “Customize Your reMarkable Screens”
Comments are closed.